E4S (Titan)
Note
This guide is written assuming you have all Blue Mage spells, appropriate gear, and know how to play your chosen role.
Overview
This is the first fight in the Eden Blue raid series and is the easiest by quite a bit. It’s pretty straightforward, but some of the mechanics are a bit tricky (Uplift). One of the main gimmicks of the fight is that AOEs (mostly) resolve using the grid on the floor, which will come up in several different mechanics.
Video Guide
Party Setup
For this fight I recommend having one tank mimic, one healer mimic, and six DPS mimics. If healing becomes challenging, you can use two healer mimics but for most groups one will be sufficient.
Utility Spells
-
 Diamondback
 -
 Frog Legs on the off-tank
Phase 1: Titan
Phase 1 is pretty straightforward and most groups won’t struggle too much here.
I recommend pulling Titan to the south at the beginning to make the first
mechanic easier. Titan will open up with Stonecrusher, a multi-hit
tankbuster that applies a physical vulnerability up debuff; this can be survived
with
Diamondback but the tank will still get hit pretty hard. The
tankbuster is also an AOE, so everyone should be careful to not get too close to
the tank.
Weight of the Land / Evil Earth
The first mechanic of the fight is Weight of the Land. Assign every player their own square in the southern half of the arena. Simply stay off the orange squares until they’re safe, and then move into your own square so that the yellow triangle markers don’t overlap.
Titan will follow up with Evil Earth which will start on two diagonally opposite squares on either the center squares or the outer corners. These AOEs start on these squares, and then will detonate the squares one square away, then two squares away, and so on. The party should start on the outside corners that are not on the diagonal line between the two starting squares, and then step diagonally inward once it is safe to do so. If the squares started on the inside, this will be after two explosions. If the squares started on the outside, this will be after three explosions. At the same time, everyone will get targeted by Force of the Land which applies orange square debuffs to everyone. These basically just act as “stack” damage and means that you need to share a square with another orange debuff to survive. It doesn’t matter how many people are on each square, it only matters that no one is on a square alone.
Titan will finish this mechanic with Voice of the Land, a moderate raidwide AOE.
Geocrush
Titan will cast Geocrush, which is a massive knockback from the target
square. Positioning for this can be tricky, but you can also use
 Surecast. He will then go into either Car form or Fist form; it is random
which one he uses first, but he will use each one exactly once during this
phase. In both cases there will be five orange markers and three yellow markers
that will need to stack/spread appropriately.
Surecast. He will then go into either Car form or Fist form; it is random
which one he uses first, but he will use each one exactly once during this
phase. In both cases there will be five orange markers and three yellow markers
that will need to stack/spread appropriately.
Titan Car
When Titan chooses Car form, everyone will want to be in the row next to Titan on the side that has two full rows. The orange markers will be immediately next to Titan, while the yellow markers will need to spread out in the remaining three squares in that row. There is no real way to assign specific positions for this, so you will just need to use your eyes and adjust as needed.
Titan will charge through the arena and knock everyone back. Stay on the outside
row until the row in front of you explodes, then step forward. Titan will also
target the tank with a line AOE tankbuster that deals proximity-based damage
based on how close the target is to Titan. Instead of lining up on the side of
Titan, the tank can actually just stand in the square where Titan is and use
Diamondback. They will not get knocked back and will survive all of
the damage, which dramatically simplifies the movement. Titan will then cast
Magnitude 5.0 which is a donut-style AOE, so everyone just needs to move
underneath him. To complicate things, he will also apply yellow spread markers
to everyone. Assign Titan-relative clock positions to spread to after the donut
AOE goes off.
Titan Fists
When Titan chooses Fist form, everyone will want to be in the same row as Titan. He will hit all other squares and then the squares in line with him. Line up the orange and yellow markers the same way as before (orange underneath the boss, yellows spread in the other squares in the same row), and when the outside AOEs go off step into the explosion. Pull Titan to the center and heal up/mitigate the Voice of the Land cast.
Titan will now start casting Landslide. When the cast finishes, he will jump to the wall in one of the cardinal directions and make a T-shaped AOE originating from where he lands. Once he picks a direction, move to the sides and away from that direction (similar to Inception in A12S). After the initial AOE goes off, step into it as the remaining squares will also blow up right after. Titan will then cleave one half of the room and also drop some Bomb Boulders in either a + or X shape. Avoid the half room cleave and step into the exploding side once it goes off, since he will hit the other side right after. Note where the bombs are, as he will drop a second set of bombs to complement the first ones. While doing the dodges, avoid the bombs and step into the first bombs after they go off to avoid the second set.
Crumbling Down
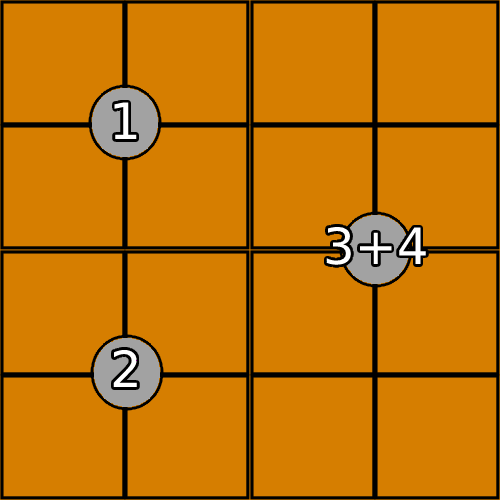
Regardless of Car/Fists order, Titan will use Crumbling Down between them. This will target two players with markers that drop large boulders with proximity-based AOE, followed shortly after by another two players with the same markers. There is an image below detailing the ideal drop positions for these markers (the positioning will make sense in a moment). The first two should be dropped on the west side, on the outer corners of the inner squares. The second two should be dropped on the east side directly in the middle. The party should wait on the east side until the west boulders have dropped, and then run directly to the west side before the east side boulders drop. The timing is pretty tight and I recommend just running straight forward to the west side before going anywhere else.
Once on the west side, we need to position behind whichever boulder is not detonating (it will be glowing and tethered to Titan). Titan will cast Seismic Wave, which is a very heavy-hitting AOE. By hiding behind the boulder we can avoid this damage entirely. As this is happening, a line of three bomb boulders will drop down in the center, west, and east. The center is always first, with east and west coming after in a random order. The goal is to move into the center immediately after it detonates to avoid the detonation on the west side. If west is blowing up second, the timing is really tight. You’re unlikely to die, but will receive a damage down debuff if you get hit. I recommend using the enemy target list and moving as soon as you see the first bomb boulder casts finish.
Titan will then cast Voice of the Land and Stonecrusher again, and then proceed
to do whichever of Car/Fists he didn’t do before. This marks the end of the
first phase, and the off-tank should use
Frog Legs to make sure
they’re second on threat at this point. It doesn’t necessarily have to be used
here, but it is one of the easier times to remember to use it.
Phase 2: Titan Maximus
Titan starts the phase with Earthen Fury, a heavy-hitting raidwide. He will then cast Earthen Fist, which targets either the west or east side with AOE damage and a big knockback. There are two hits here and the sides each targets is random, but you can look at his fists and see which is being “channeled” to know where he’s going to hit. While this is happening, he will also mark some squares as unsafe with Weight of the Land. We just need to start on whichever side is safe first, and then cross over or stay (depending on which side is safe second) while avoiding the unsafe squares.
Next Titan will case Dual Earthen Fists. This is a huge knockback from the
front of the room along with a blue Weight of the World marker. At the same
time, there will be Earthen Anguish tankbusters on the top two threat
targets followed by a Megalith shared tankbuster. This marker is similar to
the ones from before, but it does a lot of damage and has an explosion radius
of 2. This means that the square the player is on and all adjacent squares will
all blow up. To resolve this, have the tank position on the west and the
off-tank position on the east. The off-tank can just
Diamondback
to avoid the knockback and mitigate their buster. The main tank should use
Surecast and mitigate with
 Dragon Force, and mitigate
the Earthen Anguish with Diamondback after.
Dragon Force, and mitigate
the Earthen Anguish with Diamondback after.
Tectonic Uplift 1
Our first major mechanic of this phase is Tectonic Uplift. For this, players should be separated into light parties (two groups of four). Two diagonally-opposite quadrants of the arena will be targeted with an AOE and raise up after some delay. A bunch of various yellow/blue/orange markers will go out requiring precise resolution, followed by another Earthen Fury cast. A raidplan for this mechanic can be found here, but the full flow of mechanics is as follows:
- One light party should stand in the north quadrant being raised, while the other stands in the south quadrant being raised. This is counterintuitive as you need to be standing in the glowing squares.
- Two players will get marked by blue Weight of the World markers. These players need to drop down to the lower platform and stand on the outer corner. If there is one marker in each party, then you can easily stay split by north/south and use the lower platforms accordingly. If they are both on the same side, you will need to use your eyes to adjust or call out who is going where such that each lower platform has exactly one Weight of the World marker.
- Two yellow and two orange markers will appear on players up top. At the same time, the lower platforms will have AOEs appear such that one side has two safe squares and the other has three safe squares. The orange markers should drop down to the side with two safe squares and stack together, with the previous blue marker player standing on the other safe square. The yellow markers should drop down to the side with three safe squares and stand on separate squares from each other and the previous blue marker player.
- Two more blue markers will appear on the remaining players. These should be
dropped on the outer corner of the raised platforms. If they are on different
sides, then they can just be dropped on the outer corners. If they are on the
same side, then these players will still need to move to the outer corner but
must use
Diamondback to survive.
- Return to the center to get healed up for Earthen Fury.
Rock Throw & Plate Fracture 1
Next up Titan will target two random players with Rock Throw, which puts them in a gaol. Players must be broken out of these before they die, and the gaols must be spaced far enough apart such that they don’t tether together and get vulnerability down buffs. At the same time, Titan will use Plate Fracture and start punching out quadrants of the arena. The two players targeted by Rock Throw should separate into the north and south half of the arena, and then position on the east or west side depending on which is safe from the first Plate Fracture. Titan will continue punching out quadrants until only one remains. Focus down whichever gaol will get punched first, and then break the second person out after. Once everyone is on the last quadrant, Titan will cast Tumult which is a series of mild raidwide AOEs, so just heal through that.
Titan will now use Dual Earthen Fist again, but this time there won’t be a
Megalith cast at the end. The off-tank should try to
Diamondback
early this time so that they have enough time to move for the next mechanic,
which is just Earthen Fist combined with Evil Earth from phase 1. The dodging
can be slightly tricky, but you just need to avoid the east/west punches as
before and step into Evil Earth squares after they’ve exploded and become safe.
Tectonic Uplift 2
Titan will use Tectonic Uplift again, but this time it’s a little bit different. We no longer can rely on our light party split from before, but Titan will initially pick four people to target with orange markers and four people to target with nothing. This is effectively our party split for the beginning of the mechanic. A raidplan can be found here, but the full flow of mechanics is as follows:
- Send the four orange marker players to the south platform being raised up, and the four unmarked players to the north platform being raised up. Make sure the orange markers are standing on a square together!
- Two players will be targeted with gaols and should move to the outer corners of their platform. If both gaols end up on the same platform, one will need to be on the inner corner of the platform. If the gaols are on opposite corners then they will still not tether to each other, but it is quite tight.
- The remaining players will all be targeted with yellow markers. Everyone needs to be on their own square (including gaoled players) while gaols are broken.
- Two players will be targeted with blue markers; handle this the same as in Uplift 1 by dropping down to lower platforms and moving to the outer corners.
- Four of the remaining players will be targeted with orange markers, while the lower platforms will be targeted such that one has exactly one safe square and the other has two safe squares. The orange markers need to drop down to the side with two safe squares and stack together while the blue marker players stand in their own safe squares.
- While the orange markers are going out, the last two players will be marked
with blue markers. As before, they need to move to the outer corner of their
platform. If they happen to be on the same side, they will need to use
Diamondback to survive.
- Return to the center to get healed up for Earthen Fury.
Plate Fracture 2
After Earthen Fury, Titan will cast Plate Fracture again and start punching out
2x2 squares. At the same time, he will use Megalith on the main tank again which
should be mitigated with
Diamondback. Titan will punch out another
2x2 square, leaving a 2x4 rectangle. When this happens, four players will
receive orange square markers, three players will receive yellow triangle
markers, and one player will receive a blue triangle marker. To resolve this,
have the orange players stack on one of the inner-most squares (relative to the
actual arena center), the yellow players spread around them, and the blue player
move to the opposite side of the platform. My group did this relative, but you
could do it true north if you want. Regardless of how you decide to do it, some
example positions are shown below.
Horizontal Positions
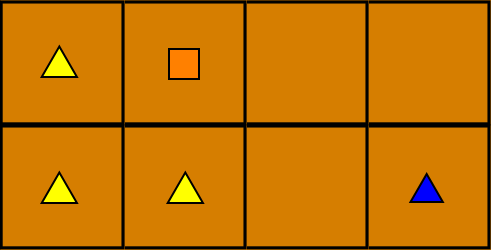
If using relative positions, this is what it would look like if the north platforms got punched out. We always had our orange/yellow players going to the left facing the center and the blue player go to the right facing the center.
Vertical Positions
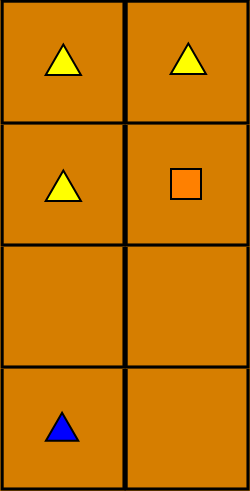
If using relative positions, this is what it would look like if the east platforms got punched out. As with the above example, orange/yellow players go left facing center and the blue player goes right facing center.
Phase 3: Baby Titan
Once Plate Fracture resolves, Titan will cast Earthen Fury again, followed by Orogenesis which spawns the little Titan from Phase 1 again where mechanics from Phase 1 and 2 will occur simultaneously. Truthfully this phase is extremely hectic, especially with the random targeting, so we won’t even discuss it. This phase is quite easy to skip with a competent group so it’s nothing to worry about, anyway.
Final Sting
Note
Final Sting is harder to justify bringing for higher level content since boss HP is significantly higher. If you are able to fit it into your loadout then great, but don’t stress about it too much.
Titan’s Final Sting threshold is roughly 7%. Once he is at 7%, apply
 Off-guard, use
 Moon Flute, any Primal abilities you have, then
finish with
Moon Flute, any Primal abilities you have, then
finish with
 Whistle and
 Final Sting.