A4S (Manipulator)
Note
This guide is written assuming you have all Blue Mage spells, appropriate gear, and know how to play your chosen role.
Overview
This is the fourth fight in the Morbol raid series and is one of the easier ifghts. The mechanics can be a little bit clunky, but it’s still very approachable even for most party finder groups. The basic flow is to kill one leg at a time and then Manipulator itself, and each time we kill a leg the mechanics change.
Video Guide
Party Setup
For this fight I recommend the standard one tank mimic, two healer mimics, and
five DPS mimics setup. You can run a single healer to skip Royal Pentacle more
easily, but it does require some extra awareness and extra healing via
 White Wind if the healer gets kidnapped in the middle of the
fight.
White Wind if the healer gets kidnapped in the middle of the
fight.
Utility Spells
-
 Mighty Guard on three DPS for dealing with Jagd Dolls.
 -
White Wind to help with healing if healers are kidnapped.
-
 Bomb Toss or
 Faze to stun legs when they cast
Perpetual Ray.
Faze to stun legs when they cast
Perpetual Ray.
Phase/Leg 1
The first leg doesn’t really require much discussion since it will die to Moon
Flute Openers almost immediately. Stay away from the tank, though, to avoid
splash damage from Hydro Thermal Missile. I recommend holding
 Nightbloom to use on the second leg since it is mostly wasted on
this leg otherwise.
Nightbloom to use on the second leg since it is mostly wasted on
this leg otherwise.
The order in which legs are killed doesn’t matter, but you do need to make sure everyone is attacking the same leg. When one leg dies the others are fully healed. I usually start with the Right Hindleg and kill them in counterclockwise order from that.
Manipulator becomes targetable for a brief period after a leg is killed. It will
then become untargetable and cast Mortal Revolution, a raidwide AOE that
gets stronger every time it is used. I recommend applying
 Bad Breath before it becomes untargetable.
 Gobskin
is also helpful here.
Gobskin
is also helpful here.
Phase/Leg 2
Almost immediately after this phase starts two players will be targeted by Quarantine. They will be removed from the main arena and put in a smaller separate arena where an add awaits them. Once they defeat the add they return to the main room.
Note
If the tank gets targeted by Quarantine, someone else will have to use
Mighty Guard and tank until they return. If both healers are
targeted, others will have to help heal with
White Wind until they
return.
During this phase Manipulator will use Carnage, which spawns a bunch of steam bits around the arena that target a random player with a bunch of tethers. After a short delay, the steam bits will shoot at whoever they are tethered to, dealing a small amount of AOE damage. The tethers can be intercepted by other players, so whoever gets targeted should stand still while the others stand between them and the bits so that they targeted player doesn’t die.
From this point onward you need to keep an eye on all of the legs. If a leg is
releasing steam then it needs to be stunned to interrupt
 Perpetual Ray, which is a multi-hit attack that drains 3000 MP per
hit.
Perpetual Ray, which is a multi-hit attack that drains 3000 MP per
hit.
Phase/Leg 3
Carnage will continue during this phase so be ready to intercept tethers as needed.
The main mechanic of this phase is the Straf Doll and Jagd Dolls. One large Straf Doll will spawn in the center of the arena and one small Jagd Doll will spawn in the east, west, and south of the arena. If a Jagd Doll gets close to the Straf Doll, the Straf Doll will consume it and deal raidwide damage based on how much health the Jagd Doll has.
To handle this we have the tank pick up the Straf Doll and assign one DPS to
each Jagd Doll. The Straf Doll doesn’t hit very hard itself, but it does apply a
Slash Vulnerability Up debuff. This can be mostly ignored since we should only
be seeing one doll phase, though. The Straf Doll cleaves so it should be faced
away from the party. The Jagd Dolls don’t hit hard at all and are easy to deal
with. The doll DPS should put on
Mighty Guard so that they can
hold aggro on their targets, then bring it down to about 20-30% HP. Once it’s
low enough, it needs to be brought to the Straf Doll. The feeding of the Jagd
Dolls should be staggered so that the party can be healed between explosions. If
a DPS accidentally kills their doll then a new one will respawn. The Straf Doll
needs to be killed once it has eaten all three Jagd Dolls. If you take too long
to do this, the Straf Doll casts Wirbelwind which sets everyone’s MP to 0.
Phase/Leg 4
At the beginning of this phase Manipulator will cast Judgment Nisi which applies a mild DOT effect to two players. One will be orange and one will be blue. If two players stand on top of each other they will pass their Judgment Nisi debuffs to each other. If someone ends up with both orange and blue, they will die immediately. To handle Judgment Nisi we just need to spread out and stay spread out until the debuff wears off.
There will be another doll phase which is the same as the previous time, so handle it accordingly.
Small Discoid is used after the doll phase, which spawns three sets of orange orbs that start moving slowly towards a random player (indicated by a marker over their head). Players should intercept these orbs (without killing themselves) to prevent the targeted person from getting hit by all of the orbs and dying.
We should only see one set of these mechanics, but they will cycle until the leg is dead.
Phase 5: Manipulator
Once all the legs are dead and we see our fourth Mortal Revolution, we now finally get to deal with Manipulator itself. This phase combines the mechanics from the previous phases but with a bit of added spiciness.
The first ability used is Carnage Zero. This is similar to Carnage from before, but it targets three random players with no tether indicator. Simply spread out to avoid overlapping damage.
After Carnage Zero will be Small Discoid again followed by Big Discoid.
Small Discoid is handled the same as before. Big Discoid deals big AOE damage
but the damgae is split between everyone hit by it. Damage mitigation like
Mighty Guard and
 Diamondback do not work on this,
so make sure to have as many people split it as posible. The tank should not
stack, though, because the Big Discoid also applies a Physical Vulnerability Up
debuff.
Diamondback do not work on this,
so make sure to have as many people split it as posible. The tank should not
stack, though, because the Big Discoid also applies a Physical Vulnerability Up
debuff.
After we’ve handled the Discoids we have to deal with Royal Pentacle. This
is actually a pretty complicated mechanic that is supposed to be solved by
passing Nisi back and forth to keep it active and then soaking damage based on
those colors. Instead, we will completely disregard the mechanic and cheese it.
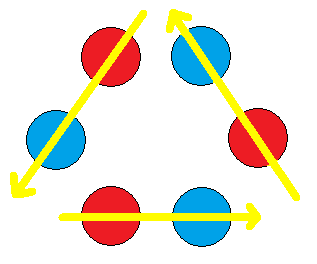
Six Steam Regulators will spawn in the center of the arena in a triangle
formation (two on each side of the triangle). These explode when touched by a
player, killing that player. If they are left up for too long they will explode
and wipe the group. We handle this by assigning three DPS to
 Sprint and jump through them such that they each blow up two
regulators. They will die and need to be resurrected, but then Royal Pentacle is
done. See below for what that looks like:
Sprint and jump through them such that they each blow up two
regulators. They will die and need to be resurrected, but then Royal Pentacle is
done. See below for what that looks like:
Manipulator will use Perpetual Ray during Royal Pentacle. This is different from the version cast by the legs and cannot be interrupted. It is a multi-hit tankbuster on the tank, so it just needs to be mitigated appropriately.
After Royal Pentacle there is a doll phase with some Carnage Zero damage and then the phase loops. Most groups will finish the fight before getting this far into the phase, and groups with solid DPS should be able to skip Royal Pentacle entirely.
Final Sting
Manipulator’s Final Sting threshold is about 30%. Once it is at 30%, apply
 Off-guard, use
 Moon Flute, any Primal abilities you
have, then finish with
Moon Flute, any Primal abilities you
have, then finish with
 Whistle and
 Final Sting.
Depending on how strong your group’s DPS is you may be able to just do a Moon
Flute Opener and then a
Final Sting combo once Waning Nocturne
wears off when you get into the last phase.
Final Sting.
Depending on how strong your group’s DPS is you may be able to just do a Moon
Flute Opener and then a
Final Sting combo once Waning Nocturne
wears off when you get into the last phase.