A12S (Alexander Prime)
Note
This guide is written assuming you have all Blue Mage spells, appropriate gear, and know how to play your chosen role.
Overview
This is the sixth fight in the Morbol raid series and is one of the more difficult ones. It is a long fight with lots of phases, but each phase on its own is pretty simple.
Video Guide
Party Setup
For this fight I recommend the standard one tank mimic, two healer mimics, and five DPS mimics. It can be solo healed, it just requires some extra coordination during the time gates phase.
Utility Spells
-
 Diamondback
 -
 Mighty Guard on the add off-tank.
 -
 Stotram on non-healers.
 -
 Hydro Pull or equivalent on healer.
Phase 1: Alexander
The first phase used to be quite difficult, but now we just skip it. All DPS and potentially one healer will do a Moon Flute Opener to push Alexander to the next phase before any actual mechanics happen. If you happen to see Prey markers appear as he is transitioning you can ignore them, since they won’t actually do anything.
The only difficult part of this phase is the tank’s job. The tank should
pre-cast
 Dragon Force, pull the boss, cast
 White Wind for threat, point Alexander north, and then cast
Diamondback once Punishing Heat starts casting. Punishing Heat
is a brutal tankbuster hits for about 40k damage unmitigated, but
Diamondback makes it comfy. Alexander will also use Divine
Spear at this time, which is a conal tankbuster. This hits hard so the
non-fluting healer will need to keep the tank healthy. Both Punishing Heat and
Divine Spear can be mitigated with things like
White Wind for threat, point Alexander north, and then cast
Diamondback once Punishing Heat starts casting. Punishing Heat
is a brutal tankbuster hits for about 40k damage unmitigated, but
Diamondback makes it comfy. Alexander will also use Divine
Spear at this time, which is a conal tankbuster. This hits hard so the
non-fluting healer will need to keep the tank healthy. Both Punishing Heat and
Divine Spear can be mitigated with things like
 Bad Breath,
 Magic Hammer, and
 Addle.
Tip
If the tank can holds
Dragon Force until after the pull starts,
they can survive punishing heat with
Dragon Force and
 Chelonian Gate. This can be helpful to get some extra damage out,
but it is easiest to just use
Diamondback.
If your group pushes so fast that the tank is still in Diamondback for awhile
after the transition, this is one option to consider to make the timing more
convenient.
Chelonian Gate. This can be helpful to get some extra damage out,
but it is easiest to just use
Diamondback.
If your group pushes so fast that the tank is still in Diamondback for awhile
after the transition, this is one option to consider to make the timing more
convenient.
Phase 2: Adds
The adds phase here has three waves of adds. The first two are kind of freebies while the third set is the one that requires some attention.
The tank should start at the north side of the arena and cast
White Wind as soon as the adds become targetable. They will all
start chasing the tank, at which point they should just start kiting them in a
small circle around the center. At least one of the healers needs to watch the
tank closely as they can die pretty quickly if the adds catch the tank.
 Sprint can be used to reduce damage greatly. While the tank is
running around, the party should stand in the exact center of the arena and spam
their AOE spell to kill the adds.
Sprint can be used to reduce damage greatly. While the tank is
running around, the party should stand in the exact center of the arena and spam
their AOE spell to kill the adds.
Once the first set of adds spawns, one add will spawn just outside the center in
each intercardinal direction. These adds spam Almost Holy, a raidwide hit
that grants them a damage up buff. If you stand in the center of the arena, your
AOE spells like
Hydro Pull and
Stotram will hit all
four. If you get hit by the first four hits completely unmitigated you can end
up in
 Revenge Blast HP range for the next set of adds, but in my
experience it’s easier to just hold until they’re nearly dead, use
Revenge Blast HP range for the next set of adds, but in my
experience it’s easier to just hold until they’re nearly dead, use
 Cold Fog, and then finish them off, which still gives you a nice
damage boost on the next set.
Cold Fog, and then finish them off, which still gives you a nice
damage boost on the next set.
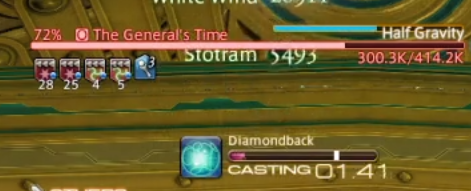
The next set of adds is the only one that really requires some care. On the West
side there will be a General’s Might and on the east side there will be a
General’s Time. These need to be tanked separately since Time will buff Might if
they’re too close. Might spams Smash, a physical tankbuster, and Time spams
Half-Gravity, a magical tankbuster. Between tankbusters they will
auto-attack and grant themselves physical (Might) and magical (Time) damage up
buffs. There are 8.3 seconds between each Smash and 9.3 seconds between each
Half-Gravity, which means
Diamondback can cover two at a time. I
recommend having the main tank pick up Time and the off-tank pick up Might. You
can use two tanks on Time and trade threat back and forth for each tankbuster,
but that consumes a lot of MP, requires
 Frog Legs, and just takes
longer so I don’t recommend it.
Frog Legs, and just takes
longer so I don’t recommend it.
The basic flow of this phase is:
- Tanks pick up adds.
- Main tank mitigates first Smash without
Diamondback, and future
Smashes with
Diamondback. Off-tank mitigates all Half-Gravities
with
Diamondback.
- Party kills Might first then switches to Time; tank picks up Time tanking duties.
- Party kills Time.
The main tank should precast
Dragon Force before picking up Might.
Once they pick up Might they should refresh
 Devour, generate a bit
of threat, and then cast
Chelonian Gate for the opening Smash. For
all subsequent Smashes, the tank can use
Diamondback to mitigate
two in a row. What the tank needs to look for is for Time to spin its hands and
apply a damage up buff to itself. When this happens,
Diamondback
can be hardcasted (no
Devour, generate a bit
of threat, and then cast
Chelonian Gate for the opening Smash. For
all subsequent Smashes, the tank can use
Diamondback to mitigate
two in a row. What the tank needs to look for is for Time to spin its hands and
apply a damage up buff to itself. When this happens,
Diamondback
can be hardcasted (no
 Swiftcast) and it will mitigate two Smashes
in a row. Most groups won’t see more Smashes than that, but we still want the
main tank to pick up Might because the opening Smash is untelegraphed and hard
to deal with without precasting
Dragon Force. After the Might is
dead, the main tank can pick up Time and handle the rest of its busters so the
other person can go back to DPSing.
Swiftcast) and it will mitigate two Smashes
in a row. Most groups won’t see more Smashes than that, but we still want the
main tank to pick up Might because the opening Smash is untelegraphed and hard
to deal with without precasting
Dragon Force. After the Might is
dead, the main tank can pick up Time and handle the rest of its busters so the
other person can go back to DPSing.
Tanking Time can be a little bit trickier, but it follows the same general idea.
Instead of being untelegraphed, Half-Gravity has a 3.5 second cast time. Since
there are 9.3 seconds between each Half-Gravity, and
Diamondback
covers 10 seconds, we want our
Diamondback cast to finish in the
last 0.70 seconds of the Half-Gravity cast. It can take some practice to get the
timing down, but once you get used to it it’s very consistent. If we have a 2.20
second GCD (standard gear), that means we have a 1.76 cast time on
Diamondback need to start our own cast between 1.04 and 1.74
seconds on the Half-Gravity cast (1.04 + 1.76 = 2.80, 1.74 + 1.76 = 3.50, or the
last 0.70 seconds of the cast).
TL;DR: We want to aim for starting our
Diamondback cast at
about 40% of the way through the Half-Gravity cast bar to cover two casts per
Diamondback.
I usually just use cast bar to know when to start, shown below. It’s pretty forgiving once you’re used to it, but it will take some practice.
Once the adds are dead you can just meet up in the middle and wait for the
transition. Alexander shows up again and casts Divine Judgment, a massive
raidwide hit that requires
Diamondback to survive. Once the first
textbox disappears (“Executing judgment protocol in 10 seconds…”) or the
second textbox appears you can safely cast
Diamondback to mitigate
the damage.
Phase 3: Time Stops
Alexander will appear in the center and become targetable again. This is a good opportunity for a Moon Flute Opener. However, you will not be able to fit an entire opener into this window since just about 15 seconds after showing up the next mechanic will start and will require everyone to move around. Alexander will apply debuffs to everyone (except one person) and start channeling Temporal Stasis, which will stop time and stop the duration of all buffs and debuffs. The debuffs that were just applied to everyone continue to count down and will resolve while everyone is stuck in place.
The debuffs applied are:
- Shared Sentence: Deals light AOE damage around the player and applies a Magic Vulnerability Up debuff. This kills the target unless the damage is shared with another player.
- House Arrest: Two players will be tethered with green and red tethers. These players must be close to each other or the tether will break, apply a Magic Vulnerability Up debuff to each player, and then they will die to subsequent damage.
- Restraining Order: Two players will be tethered with a blue tether. These players must be far apart from each otehr or the tether will break, apply a Magic Vulnerability Up debuff to each player, and then they will die to subsequent damage.
- Defamation: Deals AOE damage in a massive area (about the size of the arena) and applies a Magic Vulnerability Up debuff.
In short, Defamation players need to spread out to avoid hitting other people, Shared Sentence players need to stack with at least one person that does not also have Shared Sentence, and the tethers need to maintain the correct distance to avoid breaking.
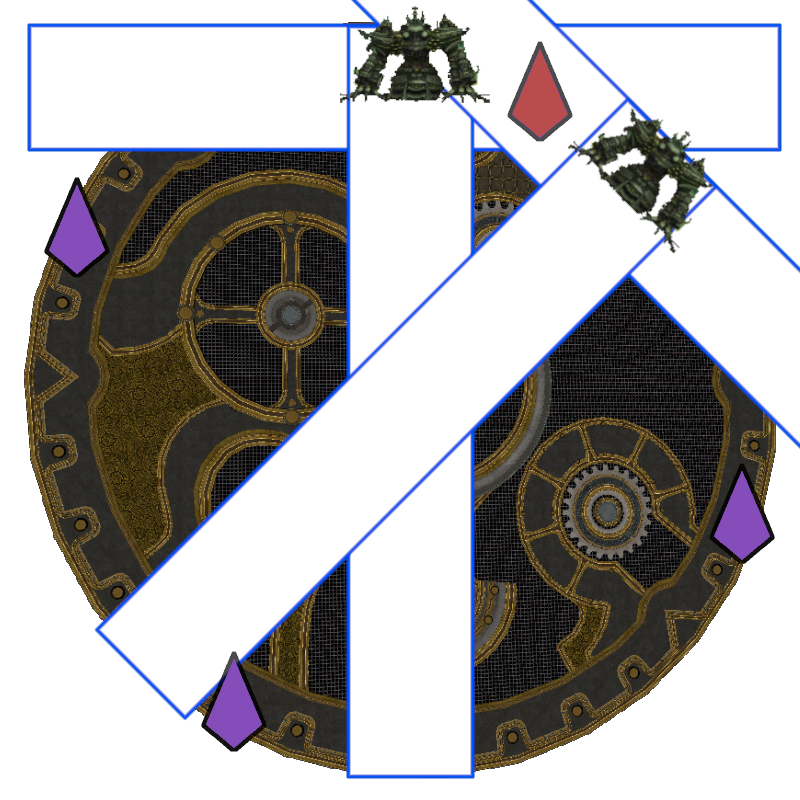
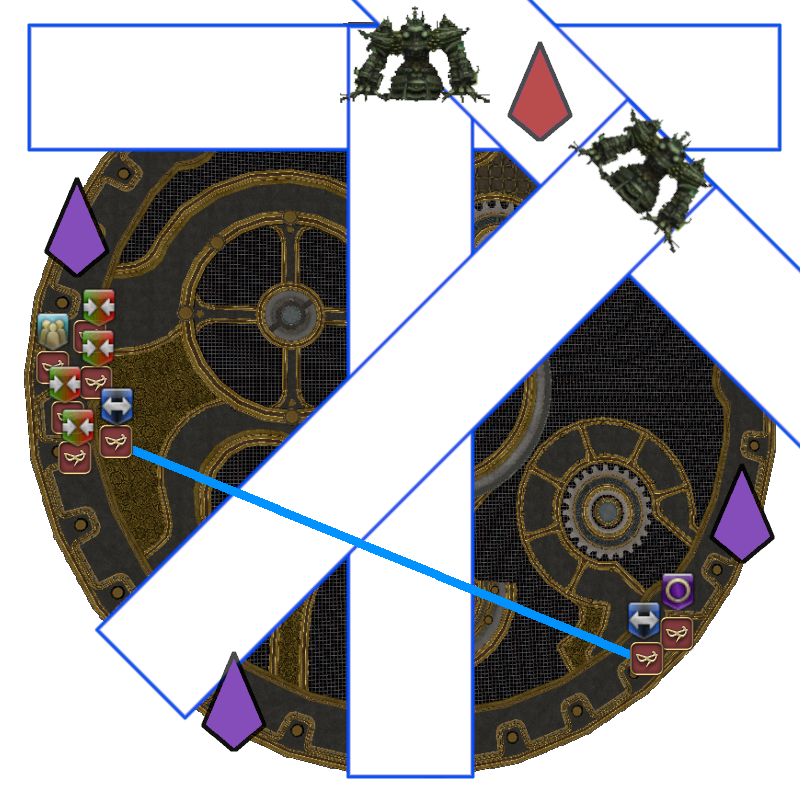
In the first time stop there will be two Shared Sentence debuffs, three Defamation debuffs, one set of tethers, and one person with no debuff. To resolve this, we will send people to the following locations:
- Defamation splits between west, east, and south (markers A, B and C below).
- Shared Sentences will go north and separate from one another (markers 1 and 2 below).
- Tether player(s) go to the Shared Sentence player on the west (marker 1 below). If the tether players have House Arrest, they will both go to the north side. If the tether players have Restraining Order, then one person goes to the north and one person goes to the south.
- No debuff goes to the Shared Sentence player on the east (marker 2 below).
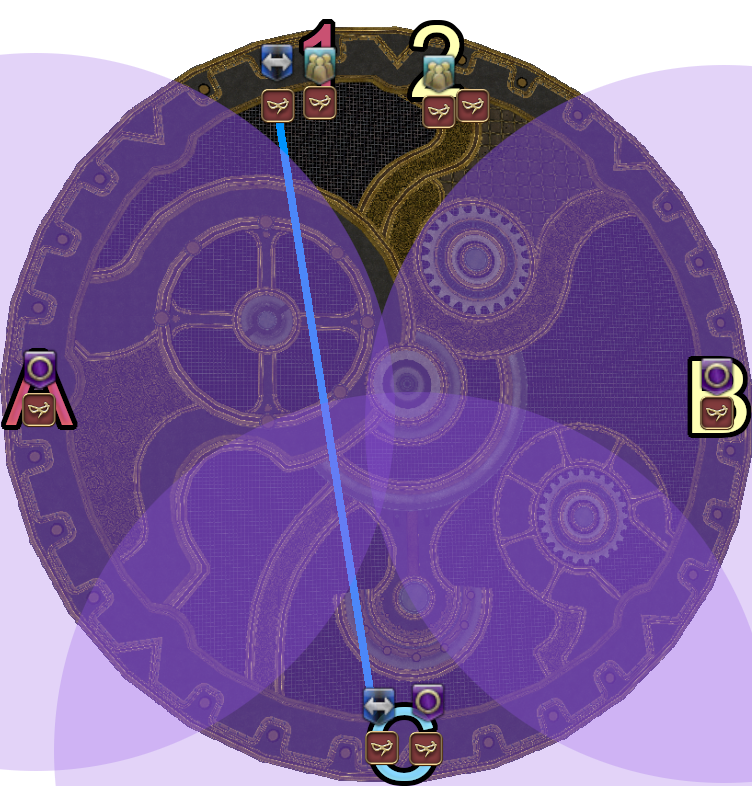
The movement has to happen pretty quickly and there is very little room for error. As soon as debuffs go out, Defamation players should call out where they are going so there is no overlap. Shared Sentence players and the person with no debuff can immediately start moving towards the north side. I recommend having Shared Sentence players jump or mark themselves in some way to indicate that they are a Shared Sentence player to prevent both from going to the same side or confusing the player with no debuff. If the tethered players have House Arrest, they can immediately start heading to the north. If they have Restraining Order, they need to quickly determine who is going north and who is going south and then split accordingly.
Tip
If players are unable to call or are uncomfortable calling Defamation locations verbally, I recommend that everyone use the following macro:
/mk bind <me>The way this works is that when someone presses it, it marks them with the Bind 1 marker. When the next person presses it, it marks them with Bind 2. When the third person presses it, it marks them with Bind 3. As soon as debuffs go out, the Defamation players can press their macros to mark themselves and figure out where they need to go (1=A, 2=B, 3=C). If two people hit it at the exact same time, it might make the marker move around so it could take a few presses. Once the three markers are out it cannot change, though, so once all three are out then the configuration is set.
If all of this is done correctly, a bunch of explosions will happen and everyone
will be alive. I do recommend using any mitigations available, at minimum
Addle and
 Gobskin, before the Time Stop actually
happens. Since the duration of all buffs/debuffs freezes during Time Stop (but
the effects continue), this is a very good opportunity to use
Cold Fog and
Gobskin, before the Time Stop actually
happens. Since the duration of all buffs/debuffs freezes during Time Stop (but
the effects continue), this is a very good opportunity to use
Cold Fog and
 Angel's Snack.
Cold Fog
probably won’t fit in the first Time Stop due to Waning Nocturne, but it will
work well for the second one.
Angel's Snack.
Cold Fog
probably won’t fit in the first Time Stop due to Waning Nocturne, but it will
work well for the second one.
Immediately after players are able to move, Gravitational Anomalies will appear. These are small black and red circles that will expand after a delay and immediately kill anyone inside. They will spawn underneath random players and also in the following pattern:
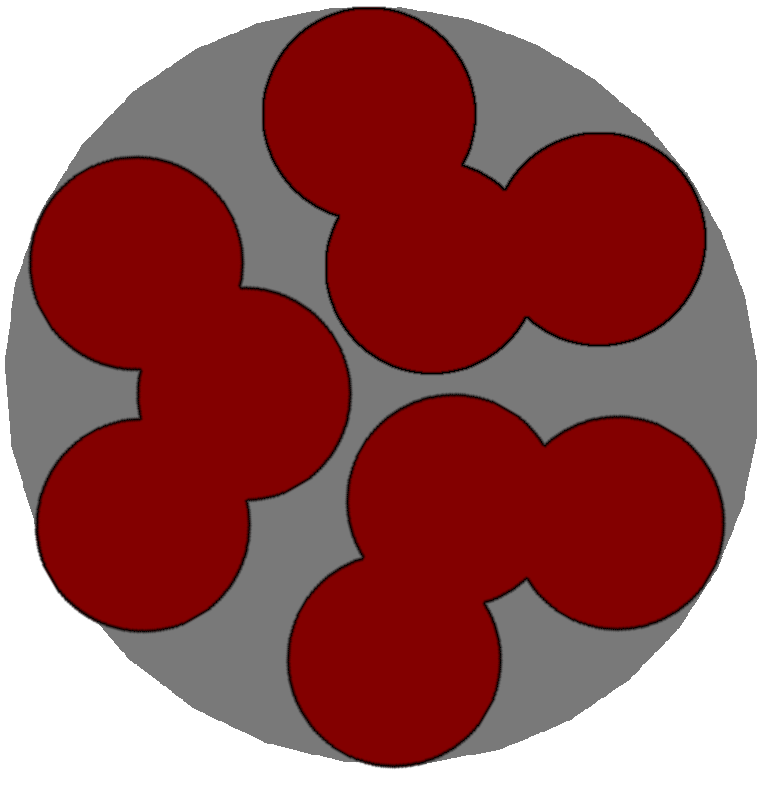
The relative pattern of the puddles will always be the same (three sets of three puddles in a triangle formation), but the whole configuration can be rotated to any angle around the center of the arena.
While this is happening, Alexander will be channeling Sacrament or Radiant
Sacrament. Sacrament will cause Alexander to shoot large rectangular beams
from his cardinal positions, and Radiant Sacrament will cause Alexander to
create a gigantic donut AOE centered around himself. You need to very carefully
dodge the Gravitational Anomalies while also positioning yourself to avoid
whichever sacrament Alexander is casting. If you struggle with the positioning,
I recommend saving
 J Kick to deal with the Radiant Sacrament cast
and
Sprint to deal with the Sacrament cast (each version will
happen one time).
J Kick to deal with the Radiant Sacrament cast
and
Sprint to deal with the Sacrament cast (each version will
happen one time).
Once sacrament is finished, Alexander will cast Mega Holy which is a
heavy-hitting raidwide. If you are at full health and don’t mitigate this at
all you will be put into range for
Revenge Blast. This was very
helpful when we were only level 60, but I don’t really recommend this strategy
anymore. Mitigate appropriately and then heal up.
After Mega Holy, Alexander will use a Divine Spear → Punishing Heat →
Divine Spear combo. The party needs to make sure they’re not in front of
Alexander for this, and the tank needs to mitigate appropriately. A well-timed
Diamondback can mitigate all three hits but it’s very difficult.
If the tank can make sure
Devour is up they will be fine for the
first hit, but
Addle,
Bad Breath,
Dragon Force, and
Chelonian Gate can be helpful as
well.
Diamondback should be used for the Punishing Heat and Divine
Spear that follow.
Once the tankbusters are done, Alexander will start casting Time Stop again. This time there will be only two Defamations but there will also be two sets of tethers. This is handled the same way as before, only the tethers need to split between north and south (if needed) and Shared Sentence players to resolve all debuffs.
Alexander will use Gravitational Anomaly again while using whichever sacrament variant wasn’t used previously, followed by Mega Holy, and then another set of tankbusters. Alexander will then teleport away for a moment before returning to the center to start the next phase.
Phase 4: Time Gates
Four time gates will appear around the arena, one each in the northwest, northeast, southwest, and southeast and one add will enter each one. One player can enter each time gate, and the adds inside must all be killed or it is a wipe. The two northern gates are considered “DPS” gates since they don’t hit hard and don’t have a ton of health, the one in the southwest is considered a “tank” gate since it uses Smash repeatedly and requires mitigation, and the one in the southeast is considered a “healer” gate since the add spams Half-Gravity does a huge percentage of health and requires constant healing.
Assign four players to enter the gates (but the main tank should not enter).
The DPS players just need to kill their add and then use the jump spots in the
room to move to the south spot and help kill the tank and healer adds. The tank
should put up
Mighty Guard, do a little bit of damage to generate
threat, and then
Diamondback. Alternatively, the tank gate player
can
 Moon Flute and use some strong spells like
 Triple Trident (buffed before entering the gate) and
 Matra Magic to kill it before Smash even happens. The healer
should engage their add and then mostly just spam Pom Cure on themselves. If you
are running a single healer, I recommend sending a DPS into this gate and having
them burst it in the same manner described for the tank gate. Once the players
kill the adds they will return to the rest of the party.
Matra Magic to kill it before Smash even happens. The healer
should engage their add and then mostly just spam Pom Cure on themselves. If you
are running a single healer, I recommend sending a DPS into this gate and having
them burst it in the same manner described for the tank gate. Once the players
kill the adds they will return to the rest of the party.
The four players on the outside will have slightly more responsibility. Alexander is going to drop four crystals onto players and do some mechanics in between. These crystals need to be dropped between each cardinal and the intercardinal spot clockwise from it. If two crystals are too close or Alexander gets too close to a crystal, the crystal will explode and deal proximity-based damage. The positioning sounds weird and confusing, but this is required to resolve a future mechanic. The positioning for the four crystals around the arena and the spot for a single drop can be shown below.

I usually like to start at the northernmost position and work clockwise from
there, but any order is fine as long as the crystals end up in the correct
positions in the end. Whoever gets targeted by the crystal, indicated by a red
marker overhead, needs to bring the crystal out to the spot immediately. After
the first crystal drop, someone will be targeted by a stack AOE. I recommend
having this player just
Diamondback. After the second crystal,
Alexander will use Sacrament or Radiant Sacrament, so just dodge accordingly.
After the third crystal Alexander will use Punishing Heat, so the tank will need
to mitigate appropriately.
Diamondback works but should be casted
early because the crystals can target the tank, and if the fourth crystal
targets them they will need to be able to move out.
Dragon Force
and
Chelonian Gate combined provides sufficient mitigation to
survive as well and can work better here.
The time gate players will usually return around the time of the third or fourth crystal, but they will not be targeted by the remaining crystals.
If all of this was done correctly, then the crystals should be in the locations shown in the image above. About 15 seconds after the fourth crystal drops Alexander will start casting Inception and then disappear. The party should return to the center of the arena and get ready for the next mechanic.
Phase 5: Inception
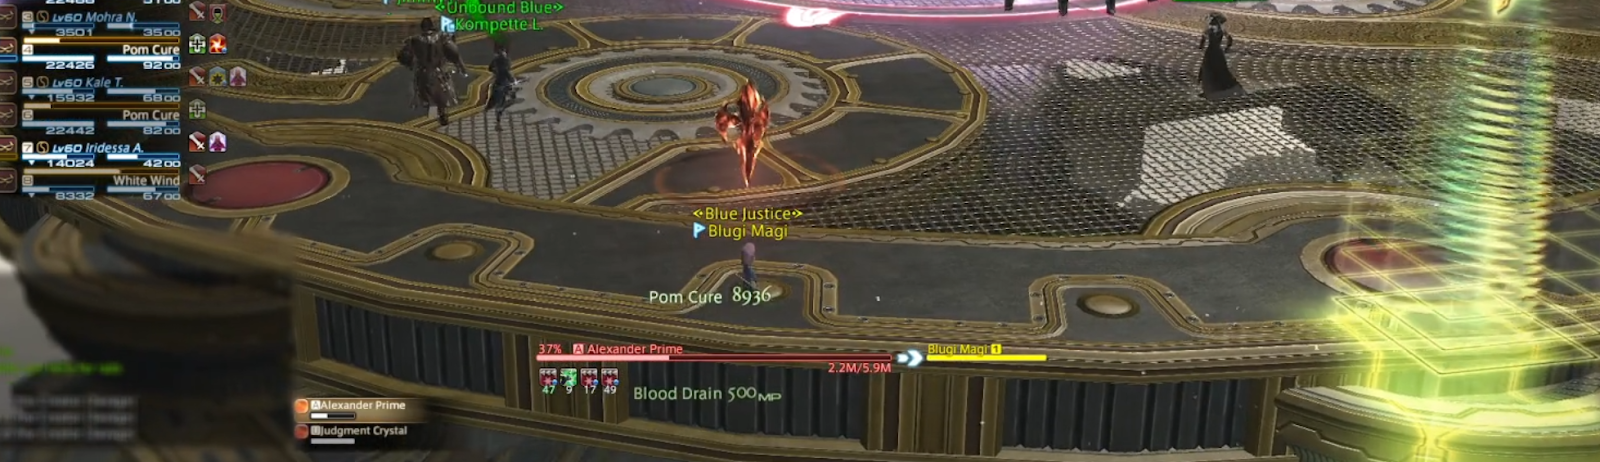
Alexander will reappear at a random cardinal or intercardinal position and cast Sacrament (the version where he shoots beams). Since every cardinal or intercardinal position is adjacent to a crystal, this will trigger Tetrashatter which causes a crystal to explode with proximity-based damage. Quickly identify which crystal is exploding and then move away from it to reduce its damage and to the relative east and west of it to avoid the Sacrament beams. It doesn’t matter if he’s spawning on the cardinal or intercardinal adjacent to the crystal, this movement will be safe every time. The image below shows Alexander spawning in either the north or northeast spot and triggering Tetrashatter on the northernmost crystal.
Alexander will cast Radiant Sacrament immediately after, so the party needs to
get underneath him quickly. Just like before,
J Kick or
Sprint can be helpful here. Alexander follows up with a Divine
Spear → Punishing Heat combo, so stay away from tank while the tank
Diamondbacks.
Once the tankbusters are done, Alexander will use Gravitational Anomaly and Incinerating Heat, a stack damage AOE. Stay out of the center of the arena, and then move into the center of the arena once the Gravitational Anomaly puddles appear. The center is always safe as long as we don’t bait puddles there.
After Incinerating Heat resolves, Alexander will start casting Inception again. This time he will also apply Time Stop debuffs to people. There will be one Shared Sentence, one Defamation, and then three random pairs of tethers. The safe spots from Alexander will be the same as before (away from crystal, relative east/west) but this time we need the Shared Sentence to go relative west and the Defamation to go relative east. Anyone with House Arrest (red/green tethers) should go to the west, and any Restraining Order tethers (blue) will need to split east and west. The tethers also disappear after a few seconds, so there is only a brief period to figure out who is going where if you had Restraining Order tethers. This is the hardest mechanic in the fight for us, and this is what it should look like for resolving the debuffs:
Phase 6: Summon Alexander
When Alexander gets summoned there will be two Void of Repentance pools that
will spawn. These apply a Magic Vulnerability Up debuff and shrink each time
they’re soaked, and explode if they’re not soaked properly. The way we handle
this is by assigning two players (usually main tank and off-tank) to stand in
the puddle, wait a few seconds, and then cast
Diamondback. These
players will still require heals since the damage is extremely high. There is
about an 11 second gap between the puddles appearing and the first hit, and then
an 8 second gap between the first hit and the third hit. You can safely wait for
the first hit and then use
Diamondback to mitigate the two
follow-up hits.
After the puddles are soaked, there will be another Incinerating Heat that needs
to be shared. The players who soaked the puddle can not stack, though, because
they will have a Magic Vulnerability Up debuff still. Alexander will then cast
Holy Bleed which is a massive raidwide AOE, followed by Holy Scourge
tankbusters (indicated by red circles overhead) which need to be
Diamondbacked, and Chastening Heat
which is a tankbuster that applies a Physical Vulnerability Up debuff. If your
group has gotten to this point it is likely a wipe. The phase will repeat with
the addition of Communion, which is a chaser-style AOE that leaves behind
puddles, before going into hard enrage.
Final Sting
Alexander Prime’s Final Sting threshold is roughly 10%. Once he is at 10%, apply
 Off-guard, use
Moon Flute, any Primal abilities you
have, then finish with
Off-guard, use
Moon Flute, any Primal abilities you
have, then finish with
 Whistle and
 Final Sting. Most
groups will be able to sting before Inception 2, which makes the fight
dramatically easier. Groups with really strong DPS can even skip Inception 1.
Final Sting. Most
groups will be able to sting before Inception 2, which makes the fight
dramatically easier. Groups with really strong DPS can even skip Inception 1.