E12S Phase One (Eden's Promise)
Note
Overview
This is the fourth fight in the Eden series and is quite tough! It’s more mechanically complicated than Shiva was, but it’s also slightly more forgiving and outside of a couple of mechanics you can zombie your way through the fight to keep progging new mechanics.
Video Guide
Party Setup
For this fight I would recommend having one tank mimic, one or two healer mimics, and five or six DPS mimics. The damage in this fight is quite manageable so solo healing is fine, and the DPS check is lenient enough that mechanic execution is the bigger concern rather than damage output.
Utility Spells
 Diamondback
 Mighty Guard
 Frog Legs on the off-tank
 Magic Hammer on at least one person
 Avail on the off-tank
Phase 1: Eden’s Promise
Eden’s Promise opens with Maleficium, a heavy raidwide AOE. A single
mitigation such as Addle or Magic Hammer is sufficient to survive. Note that
having a non-healer use
 Gobskin will push the party into
 Revenge Blast range, though this is significantly less useful
here than it was in E8S.
Revenge Blast range, though this is significantly less useful
here than it was in E8S.
Junction Shiva and Titan
The boss then casts either Junction Shiva or Junction Titan at random. Both follow the same sequence:
- Rapturous Reach: roughly 210-degree cleave on one half of the arena; move to the safe side.
- Shiva or Titan mechanic: spreads (Shiva) or stacks (Titan).
- Double Primal: two simultaneous primal attacks; find the overlapping safe zone.
- Shiva or Titan mechanic again.
The off-tank should use
Frog Legs at some point during this
sequence to secure second-on-threat position for the upcoming Formless Judgment.
For the Double Primal, the safe zone depends on which two primals are active:
- Ramuh creates circular AOEs around the boss.
- Leviathan cleaves the east and west sides, leaving a safe vertical center.
- Ifrit creates 150-degree cleaves on the north and south halves, leaving the east and west flanks safe.
- Garuda creates a pinwheel-style AOE, leaving the intercardinals safe.
As an example, if both Ramuh and Garuda are channeled together, the resulting safe spot will be intercardinals and out of center.
If Junction Shiva, assign everyone a clock position beforehand and move there for the spread mechanic. The AOE hits extremely hard, so mitigation is very valuable here. Dodge the cleave by moving to the safe side, then move to clock positions. After that dodge the Primal mechanic, then move to clock positions again.
If Junction Titan, the party handles stacks. Unlike a normal party, the targets are completely random rather than always targeting healers. There are three ways to approach this:
- Split into light parties. This is the simplest approach but the least consistent.
- Stack all eight players together with
Mighty Guard and all
available mitigations. This is the most consistent, but any missing
mitigation or insufficient healing will cause deaths.
- Stack in four pairs with
Mighty Guard. A pair wipes only if
both members are targeted, which is unlikely.
After the junction sequence ends the boss casts Maleficium again, followed by
Formless Judgment, a two-hit tankbuster on the top two threat players that
applies a heavy Vulnerability Up debuff per hit. The main tank covers both hits
with
Diamondback, and the off-tank uses
Avail on the
main tank. The second hit still deals considerable damage, so make sure the main
tank is healed up before it lands.
Diamond Dust
Regardless of which junction was cast first, the boss will always follow up with Junction Shiva and Diamond Dust. This mechanic involves icicle tethers, a knockback, a slippery floor, and multiple ground-targeted AOEs. We use a strategy called Dingus Dust that lets us cut through most of the complexity with defensive cooldowns. There is a raidplan for this strat here:
- Activate
Mighty Guard before Diamond Dust finishes casting.
- Heal to full and apply
Gobskin.
- Slide to your assigned clock position and use
Diamondback.
- Return to center while avoiding AOE circles on the ground.
- Use
 Surecast to negate the knockback.
 - Move to the clock position opposite your icicle tether and stand behind the icicle.
- Return to center and deactivate
Mighty Guard.
Earthen Fury
Junction Titan always follows Diamond Dust. The boss will cast Maleficium
first, then Earthen Fury, a massive raidwide AOE. Apply
Magic Hammer,
 Addle, and
Gobskin to
survive it.
Addle, and
Gobskin to
survive it.
Earthen Fury is immediately followed by three waves of Bomb Boulders. These work the same way as the Titan markers from E4S, except they cause circles on the ground to explode rather than squares. Each player receives a colored marker: orange markers require at least two players to share the circle, yellow markers explode only the circle the player is standing on, and blue markers explode the circle the player is standing on as well as all adjacent circles, so blue players need significantly more spacing from others. A bomb boulder spawns inside each circle and must be hit by the explosion to prevent it from detonating on its own.
We use a strategy called Bingus Boulders that groups players by color into adjacent positions for easier coordination. Before each wave, start toward the arena center in clock positions and move to your assigned spot:
- Wave 1 (four orange, three yellow, one blue): Oranges go northwest and west, yellows go north/northeast/east, blue goes south.
- Wave 2 (six orange, two blue): Oranges go west and northwest, blues go northeast and south.
- Wave 3 (four orange, two yellow, two blue): Oranges go west, yellows go northwest and north, blues go south and east.
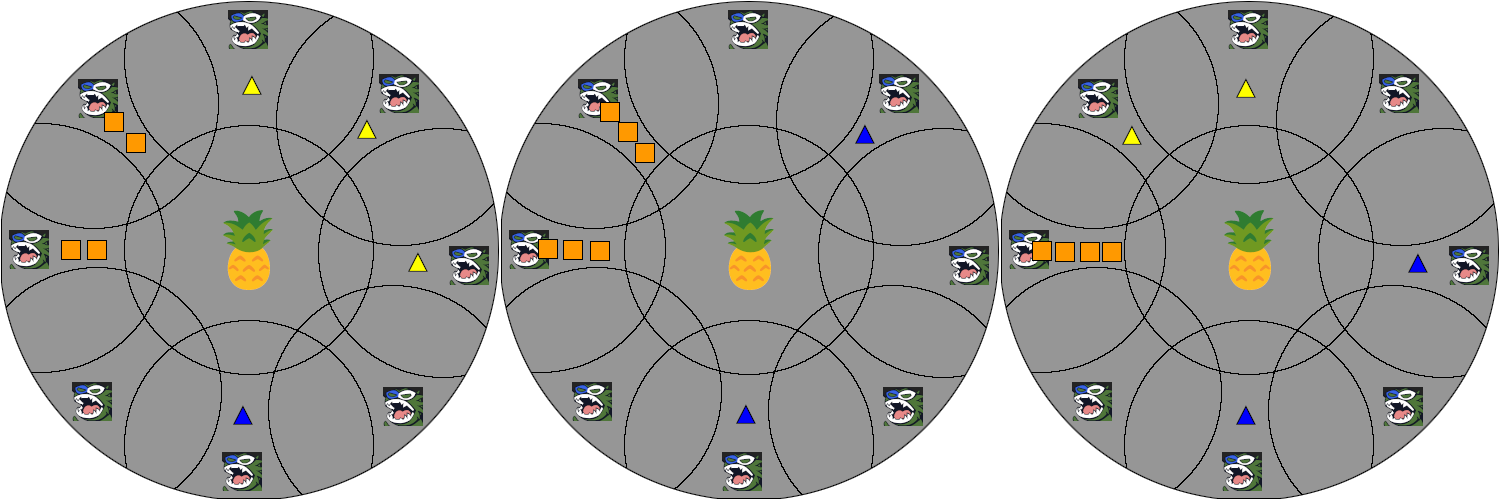
Bomb boulders spawn inside each circle and must be hit by AOE attacks to prevent them from exploding, so make sure you are close enough to the center of your assigned circle to hit the bomb.
Obliteration
Once the boulders resolve, the boss casts Maleficium and spawns a gigantic statue in the background. The party then needs to dodge a double Primal cast before setting up for the next mechanic. While this is happening, the statue will use Obliteration, a heavy-hitting line stack AOE. To handle this, dodge the Primal mechanic as a group to share the Obliteration damage appropriately. My group preferred moving to the south or east where possible, but as long as your group is consistent it doesn’t matter too much how you handle it.
Pull the boss to the south side of the arena facing north and split into two vertical light party conga lines on either side of the boss. The boss will then cast Maleficium again followed by Stock, which will show a Primal mechanic that will resolve later.
Two random players will be targeted with a stack marker. If both markers land on the same side, the marked player closest to the opposite side swaps with the nearest unmarked player on the other side, so that each side has exactly one stack. Each group of four resolves their stack, which spawns two Sculptures that tether to four players and assign them numbers 1 through 4. Note that you are not necessarily tethered to the sculpture that spawned from your stack.
Once everyone has a number, spread out to confirm your assignment. The sculptures will blast each player in ascending order with a line AOE that applies Vulnerability Up. When your number comes up, step away from the party to the north or south (whichever side has the statue to which you’re tethered) and point your beam outward. During the first two beams the boss also casts Rapturous Reach, so the whole party needs to stay on the safe side. This also means that players 1 and 2 cannot stand directly north or south and need to angle their beams slightly to avoid pointing them into the cleave.
After beam 2, one of the large statue’s hands will start glowing, indicating
where a knockback after beam 4 will originate. Players baiting beam 4 should use
 Sprint so they don’t go flying off the edge, and the whole party
should position toward the glowing hand’s side (southwest or southeast) to ride
the knockback safely. A few seconds after the knockback the previously-Stocked
primal will Release, so dodge accordingly.
Sprint so they don’t go flying off the edge, and the whole party
should position toward the glowing hand’s side (southwest or southeast) to ride
the knockback safely. A few seconds after the knockback the previously-Stocked
primal will Release, so dodge accordingly.
A second Maleficium follows, and then Formless Judgment again, handled the same way as before.
Lions
Lions is the most demanding mechanic in the phase. Four small lions spawn at the intercardinals, while two large lions spawn at north and south. The small lions will tether to one player each and blast them with fire cone AOEs, while the large lions will aim a large fire cone AOE at the nearest target which also drops a fire puddle beneath the target. There are three separate bait sequences interspersed with other mechanics.
To determine positioning, form two vertical conga lines on the north and south of the boss, or do one single one to the side of the boss (whichever is easier for your group). Players who are tethered to lions step aside. The four remaining players are assigned based on their conga line position: the two northernmost players handle the north lion (the northernmost of the two handles baits 1 and 3), and the two southernmost handle the south lion (the southernmost of the two handles baits 1 and 3).
The full sequence is:
- Form conga lines for side and lion assignment.
- Dodge Rapturous Reach.
- First lion baits resolve.
- Return to center to heal up; use
Surecast or ride the
knockback to reach your next position.
- Second lion baits resolve.
- Return to center to heal up and dodge the Stocked Primal Release.
- Third lion baits resolve.
- Dodge the final Rapturous Reach.
Using
Mighty Guard throughout this mechanic helps reduce overall
damage, though it cannot prevent casualties if fire cones overlap. Multiple
strategies exist (such as
Cross Lions or “Line Strat”),
but correct conga line setup is the most critical element regardless of which
you use.
Post-Lions
After Lions, the fight enters its final sequence. There aren’t any new mechanics at this point, it mostly just rapidly cycles through things we’ve already seen before. The full sequence is as follows:
- Maleficium
- Stock
- Junction Shiva or Titan
- Cast
- Shiva or Titan Mech (only once)
- Maleficium
- Junction Shiva or Titan (whichever wasn’t done before)
- Release
- Shiva or Titan Mech (only once)
- Formless Judgment
- Maleficium
- Maleficium (Enrage)
If you are this far into the fight and you see Junction Titan at the end, I
would just recommend having everyone use
Diamondback for safety.
When the boss dies, at least one person needs to stay alive and not get knocked
off the platform by the final cast in order for you to successfully get to the
second phase!
Final Sting
Note
Final Sting is harder to justify bringing for higher level content since boss HP is significantly higher. If you are able to fit it into your loadout then great, but don’t stress about it too much.
Eden’s Promise’s Final Sting threshold is roughly 5%. Once she is at 5%, apply
 Off-guard, use
 Moon Flute, any Primal abilities you
have, then finish with
Moon Flute, any Primal abilities you
have, then finish with
 Whistle and
 Final Sting.